Diffuse Texture & Lighting
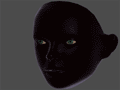
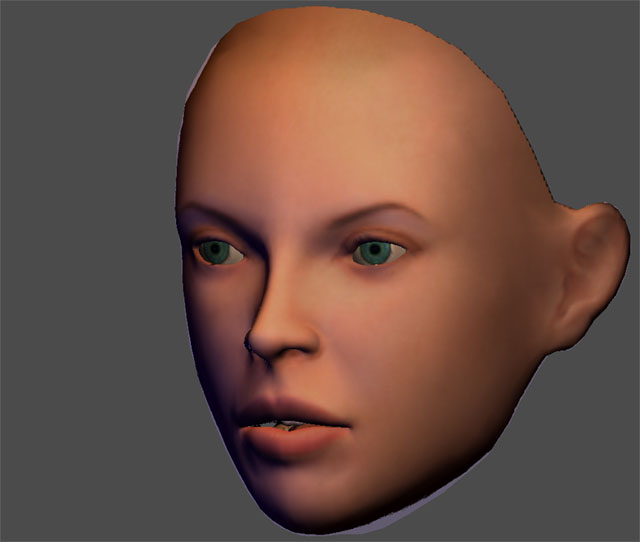
Specular & Rim Lighting
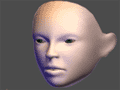
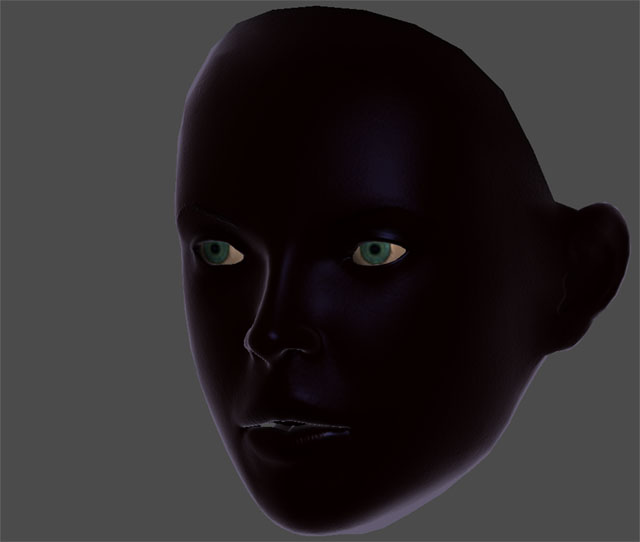
Sub-Surface Scattering

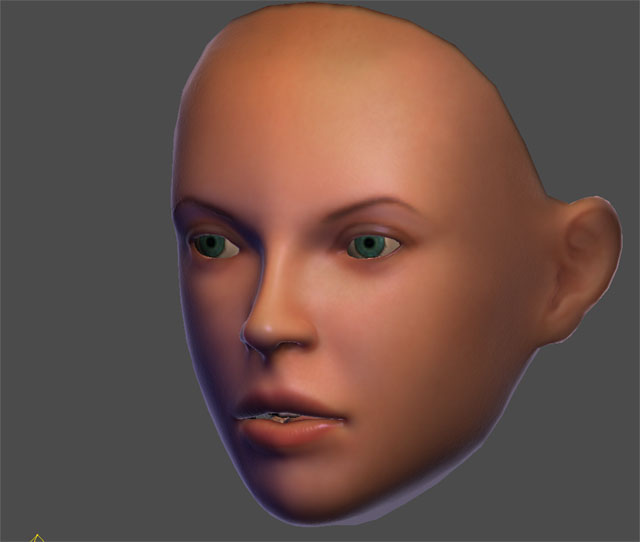
Complete Effect
|
|
SKIN SHADER
SPECS:
HARDWARE:
|
DirectX 9 or higher
|
TEXTURES:
|
- Diffuse
- Sub-surface Scattering Mask (Diffuse Alpha)
- Normal Map
- Specular Color
- Glossiness (Specular Color Alpha)
|
INPUTS:
|
- Ambient Color
- Diffuse Color
- Diffuse Texture
- Specular Color
- Specular Texture
- Shininess Bias
- Rim Color
- Rim Power
- Normal Map
- Light 1 Position & Color
- Light 2 Position & Color
- Light 3 Position & Color
- Sub-Surface Scattering Bias
|
PASSES:
|
Four
|
DOWNLOAD: (right click and choose "save target as...")
 Skin Shader Skin Shader
COMMENTS:
This shader mimics some of the properties of skin such as sub-surface sacttering, variable glossyness, subtle surface detail, and rim lighting. It's especially tailored for use on faces, but can also be used for skin in general. It uses three texture maps: a diffuse texture, a specular texture, and a normal map. It supports three point light sources and has options for controlling all surface properties.
This shader is based on the HammerTime.fx shader that ships with 3ds Max and also the sub-surface scattering technique discussed on pages 272- 275 of GPU Gems 2.
The most important thing that is required for the skin shader to work is texture coordinates in map channel three. You must unwrap the parts of your model that are using this shader using map channel three so that all of the triangles fit within the zero to one range (no tiling), the texture coordinates can not overlap each other, and you can't mirror any of the UVs. It's also best to create the unwrap in such a way as to minimize texture seems. The sub-surface scattering turns seems into dark lines, so you'll want to minimize them and hide them if possible. This texture coordinate set won't be used to apply any of the three textures that the shader uses. It's only used internally to compute the sub-surface scattering.
You can use a seperate set of texture coordinates in map channel one for the texture maps. Those coordinates can be mirrored, overlapped, and tiled if you want so you can get the most out of the texture space. You don't need to worry about minimizing or hiding texture seems in map channel one.
Here's a description of the three texture maps used by the shader and what they're used for:
Diffuse Map:
The surface color of the skin. Be sure not to bake a lot of direct lighting into this map. It needs to be mostly just the diffuse color of the surface. You can change the overall color of the diffuse map using the Ambient Color control of the shader. You can also effect the surface's color using the Diffuse Color control.
Diffuse Map Alpha Channel:
The alpha channel of the diffuse map is used by the shader to know how much
sub-surface scattering to apply. White in the alpha channel means that light
beneath the surface will be scattered the most. You would use white in areas of
the face that are very fleshy - like the cheeks. Black means no sub-surface
scattering. This might be used on the bridge of the nose and other areas where
the skin is thin and the bone is very near the surface. In general you'll
probably want to keep this alpha channel fairly light with a few darker areas.
Specular Map:
This map allows you to define the color of the specular highlights on a per-pixel
basis. Using this map, you could make it so the specular on the forehead is
mostly green and the specular on the cheeks is mostly blue. Whatever color you
want the specular to be for each part of the face - paint it in this map. You can
also effect the overall color of the specular highlights using the Specular Color
control of the shader.
Specular Map Alpha Channel:
The alpha channel of the specular map defines the glossyness of the specular
highlights. White in the alpha channel means the surface is very glossy/shiny
and the specular highlight is very small and sharp. You might paint white here
for the lips to make them appear wet. Black in the alpha channel means the
surface is very dull/diffuse and the specular highlight is very broad and blurred.
You might paint the cheeks darker here and other areas of the face that are less
shiny or less reflective. You can also make the whole object more or less shiny
using the Shininess Bias control of the shader.
Normal Map:
The normal map defines surface features and shapes that are too small or detailed
to be modeling in the geometry. You might create tiny bumps in your normal map
to simulate the pores of the skin or the tiny strips on the lips. Only the
specular lighting uses the normal map - so if you have your specular very low,
you may not see the effects of the normal map. Since the normal map is used only
by the specular, you should treat it like a bump map and not lean on it to make
a very low poly face look more detailed. Try to create the main shapes of the
face using polygons and mainly use the normal map for tight surface details like
pores, wrinkles, etc. You can switch back and forth between positive and
negative Y format normal maps using the "Flip Normal Map Green Channel" check
box.
The shader also supports several other additional inputs. Here are descriptions of what they do:
Rim Color:
This is the color that will be used for the rim lighting on the model. Rim
lighing simulates the effect of peach fuzz where the skin is brighter at glancing
angles than when viewed straight on.
Rim Power:
This values controls how far toward the edge the rim lighing is. Low numbers
spread the rim lighting in toward the center of the model and higher numbers push
the rim lighting further to the edge.
Sub-Suface Scattering Bias:
This number is added together with the alpha channel of the diffuse texture to
determine how much sub-surface scattering to apply. If you want your whole model
to use full sub-surface scattering everywhere, set this to one. If you want to
control the amount of sub-surface scattering with the diffuse map alpha channel,
set this to zero. If you don't want any sub-surface scattering, set this to
negative one.
Lights:
The shader supports three point lights. You can define which point lights in your
scene you want to use by choosing them in the drop-down boxes. Only light 1 will
create specular lighting. This is a performance optimization. Lights 2 and 3
will only effect diffuse light. Don't forget that you can change the color of the
lights on the standard light modifier panel.
This shader is intended to be used by the DirectX 9 shader of 3DS Max and I'm
pretty sure that it will only function correctly within 3DS Max since it uses
some code syntax that is specific to Max. If you get it to work correctly
in another application, I'd love to hear about it!
INSTRUCTIONS:
For instruction on how to apply this shader to your model in 3DS Max, read my tutorial - HLSL Shaders in 3DS Max.
For instruction on how to create normal maps for this shader, read my tutorial - Creating and Using Normal Maps.
ADDITIONAL:
If you have trouble getting this shader to work correctly in 3DS Max, send me an email. I'll see If I can help. Also, I'm an artist - not a programmer. If you are a programmer or know more about shaders than I do and you find something in this shader that is poorly written, broken, etc, I'd love to hear from you. I've mostly taught myself how these things work so if you have some pointers for me that would be great!!
Return to the list of Shaders
|