Tips for Editing Normal Maps
So you've created your normal map, you apply it to your model and it looks great! -- Except for those annoying seams and those few spots that didn't turn out quite right. Well that's easy, you can just open the normal map in Photoshop and fix those with the clone tool, right? WRONG!
A normal map is very different from a regular texture, because the colors represent the X, Y, and Z values of a directional vector instead of just a color. Not only that, but the three values together must yield a directional vector whose unit lenth is one (a normalized vector). This means that only a very specific set of colors can be used. So you can't just go painting colors and expect them to give you good lighting when used as a normal map.
"Can't I just paint with the colors that are already there?" - Yes, but if your brush has a soft edge, the blending will give you colors that no longer result in a vector length of one. Just about any editing that you do in your paint program that doesn't preserve the exact colors that were there when you started will give you incorrect results.
"So I can't edit my normal map at all in a paint program?" - You can. But there are a few things that you need to watch out for and a few tips that will help you get better results. Read on!
Re-normalization
The main thing that you need to do to avoid the problems that I mentioned above is to "re-normalize" your normal map. You can paint on it, and use the clone tool and edit all you like as long as you make sure all of the colors result in a vector with unit length one (normalized) when you're done.
Luckyly, Nvidia has created a very cool Photoshop plug-in that will do this for you. When you're done with your editing, you just run the plug-in and it looks at every pixel in the normal map and adjusts the colors so they give you normalized vectors! You can grab the plug-in here. Download the "Adobe Photoshop Normal Map Plugin" and install it. Once you're done with the installation, follow the step below to "re-normalize" your normal map.
- If you added layers while you were editing, flatten your image so it's all on the base layer. Get rid of any alpha channels if you have them.
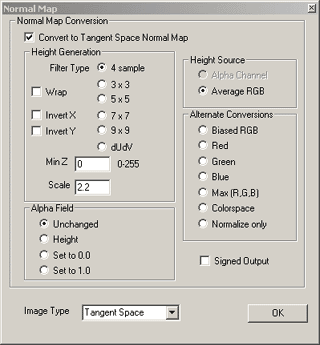
- Choose "Filter -> nvTools -> NormalMapFilter . . ." This will bring up the Normal Map filter options window. There are options here for converting a bump map into a normal map, but since we already have a normal map, we're just going to use the normalization feature.
- Under "Alternate Conversions" choose "Normalize only." Click "OK."
That's it! Your normal map is now normalized again, just like it was before you started editing. Now you can save it and apply it to your model.
Seams
One of the main problems that occurs when creating normal maps is that there are seams at the edges of UV regions. This problem can be solved in several ways. The best way is to have the program that creates the normal map expand the colors of the map beyond the edges of the UV regions. In some normal map creation software this is called "edge padding" and in others it's called "expand border texels." There may be other names for this feature, but that's the first thing you should try if you're having trouble with seams.
If that doesn't work, another method is to paint a small buffer strip of light blue (127, 127, 255) along both of the edges of the seam. This light blue color represents the vector that points straight out of the surface. If both edges of the seam are using this color, they'll match each other better. You might lose a little of your high res detail, but at least you won't have an ugly seam. I recommend only using this method if you really need it.
Mip-Maps
Real-time textures use mip-maps to reduce texture flickering and sizzling when the texture is smaller on the screen than it is in resolution. Mip-maps are smaller copies of the texture. The smaller the texture appears on screen, the smaller the copy of the texture that gets used. Usually the mip-maps are automatically generated when the texture is used and the artist doesn't have to worry about them at all. With normal maps, it's a different story.
Mip-maps are generated by copying the texture and scaling it down. For regular textures, this works fine, but for normal maps, the scaling also de-normalizes all of the normals. That means that as your model moves away from the camera, all of the normals will get de-normalized and the lighting on your model won't look that good.
The solution to this problem is to make sure that when mip-maps are created for normal maps, the mip-maps get renormalized. This is probably a step that a graphics engine programmer could do pretty easily. If you don't have a graphics engine programmer handy, you can do it yourself by using DDS as your image file format. 3DS Max will read DDS image format.
DDS stands for Direct Draw Surface. It's an image file format that is used natively by DirectX. It contains extra information that DirectX can use - like mip-maps. Nvidia makes a plug-in for Photoshop that will read and write DDS format. The plug-in allows you to do a ton of stuff with the image when you save it in DDS format. Most importantly it allows you to normalize all of the mip-maps. If you installed the plug-in that I talked about above in the "Re-normalization" section you already have it. If not, you can get it here. Once you're done with the installation, follow the step below to "re-normalize" your mip-maps.
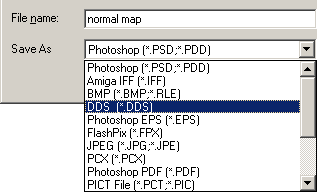
- In Photoshop open your normal map and choose "Save As . . ." Pick DDS format and click "Save."

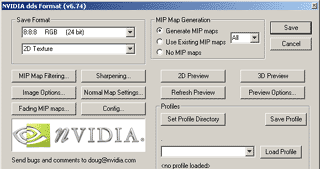
- When you click the Save button, this options dialog will appear that allows you to specify all of the parameters for saving your image.

I was really impressed with how much control all of these options gave me over exactly what I wanted to do with my image. You can do a lot more with DDS format than we're going to cover in this tutorial.
-
Under MIP Map Generation, choose "Generate MIP maps." The plug-in will automatically create mip-maps for your normal map when you're ready to save. The mip-maps will be stored as a part of the DDS format image.
- Click on the "Normal Map Settings ..." button to access the normal map conversion options. The following window will open:

-
Make sure that the "Convert to Tangent Space Normal Map" box is checked. Under "Alternate Conversions" choose "Normalize only." Click "OK." These settings will ensure that when your mip-maps are generated, they will be re-normalized. Now click the "Save" button.
Now you've got a DDS image saved that has correctly normalized mip-maps. The lighting detail will remain correct regardless of the model's distance from the camera.
Texture Compression
To allow for as many textures as possible, most video games use some type of texture compression. Most use S3TC, DXTC, or some type of palletization. These types of texture compression work well for diffuse textures, but they don't work so well for normal maps.
All of these compression techniques change that colors of the image so that it can be smaller. This causes the normals to become denormalized. The compression also introduces other artifacts. These artifacts aren't as obvious on a diffuse texture, but on a normal map they really stick out.
The following table illustrates the effects of texture compression on a normal map. The left column shows the normal map itself with several different types of texture compression. The right column shows the lit model with the normal map applied.
While the file size savings is significant, the quality loss is also significant with all types of compression. It's pretty obvious from the chart that 8 bit compression is not usable at all. You might be able to use 16 bit, but it's only 2:1 compression. There is very little difference between DXT5 and DXT1 except that DXT5 also has an alpha channel (not shown here) which can contain extra information - like a height map.
Obviously, the best thing to do is to not use any texture compression at all on normal maps. If you absolutely have to use compression, DXT1 seems to be the best option. It has the smallest file size and is better looking than 8 bit.
There is another option, but it requires that your normal map be changed around a bit and also that your shader be edited slightly. DXT5 gives the most quality to the green channel and to the alpha channel. We can take advantage of this to "hijack" the DXT5 format and turn it into a normal map compression format. First we need to re-arrange the data in the normal map. Take the red channel data (X) and put it in the alpha channel. Now make the red and blue channels black. Now we need to adjust the shader to switch the data back around for us. The shader needs to be told that the red channel data is in the alpha channel of the texture and that it needs to calculate the blue channel values itself. This is possible with a little algebra because we can assume that the vector that results from R,G, and B will be unit length one. If you are able to make these changes to both the normal map and the shader, you'll get 4 to 1 normal map compression with very little quality loss!
All of the normal mapping shaders on my web site now offer this compression solution as a second technique in the shader - so you can get four to one texture compression and good normal map quality as well.
I hope that the tips on this page have been helpful for you. I've learned that the data in normal maps is very sensitive and can't just be treated like any other color map. I hope that as a result of the things I've written, you'll be able to more successfully handle and edit normal map data.
In the first Normal Map Tutorial, I explained how to use the Nvidia Cg Plugin for 3DS Max 5 to apply your normal map to a model. On the next page I'll explain lots of other good methods to apply your normal map to your model. Read on!
So far, I've only written the first four pages of the tutorial. Come back soon for the last page.