Page 6: Applying Normal Maps to Your Model
Note: The information on this page is a bit out of date now that 3DS Max v6 and v7 are out. If you're using those, check out my tutorial on how to use HLSL shaders in the real-time viewport.
So now that you've got a normal map, what do you do with it? Somehow you need to get the computer to interpret all of those crazy blue, pink, and green colors as surface normal information instead of color information. How is that done? Of course the IDEAL way is to get your game company's game engine to do it for you! However, lots of people don't have access to a full on game engine that supports per-pixel lighting. If you don't, there are several alternatives. ATi's NormalMapper comes with a simple program called NMFView that will allow you to choose your model and then choose your normal map and it will render the model with per-pixel lighting using the normal map. You can also look at page 8 of the tutorial for additional methods.
On this page, I'm going to explain the complicated way to see your normal map on your model. We're going to go through the process of setting up 3DS Max to display real-time shaders in the viewport. (You can also do it in Maya.) You can then use a shader to display your normal map on your model. The reason I want to go about explaining this complicated method is because you'll be able to use it for lots of things. Real-time shaders in Max can give you all of the control over the surface appearance of your model that you get with Max's materials. It's possible to create and use shaders that render in real-time that look just like the software rendered materials that take several minutes to render. You, the artist, can have full control over how your model looks when rendering in real-time.
Note: This page focuses mainly on viewing normal mapped models in the viewport of 3DS Max 5.1. If you're not using 3DS Max 5.1, chances are that your software can also display normal mapped models in its viewport. Take a look at page 8 for a list of programs that can display normal mapped models.
Note: I've received several emails from people who tell me that the steps on this page only work if you have an Nvidia graphics card. If you're using a graphics card from ATi or another brand, take a look at page 8 for a list of alternate methods of displaying your normal maps.
Eventually I want to write several tutorials that explain the basics of writing shaders in Cg and HLSL so you can start to have full control over the surface appearance of your models. For this tutorial, however, I'll just provide you with a shader that I wrote that you can use in Max or Maya to view your normal map.
Here's what we're going to do:
- Install Nvidia's Cg Plugin for Max (or Maya)
- Enable real-time Cg shaders in the viewport and choose the normal map shader
- Apply the normal map shader to your model
Let's get right to it. The first thing that you need to do is be sure that you have 3DS Max 5.1 installed with Service Pack 1. If you have anything less than that, Nvidia's Cg plug-in won't work. Once you've got Max 5.1 Service Pack 1 installed, follow the steps below. (If you're using Max 6, it can use HLSL shaders in the viewport natively. It should be pretty easy to set up. I don't have Max 6 so I can't offer direct instructions.)
- Install Nvidia's Cg Plug-in
This step requires that you install two items. The first is the Cg Compiler. This is a program that takes the shaders that you're using in Max or Maya and coverts them (automatically without you needing to do anything) into machine language that your graphics card can use. You can download the Cg Compiler here:
http://developer.nvidia.com/object/cg_toolkit_1_1.html
Once you've installed the Cg Compiler, you can install the Max or Maya Cg plug-in. You can find the Max version here:
http://developer.nvidia.com/object/IO_3dsmaxCgFXPlugin.html
or the Maya version here:
http://developer.nvidia.com/object/MayaCgPlugin.html
- Configure Max for Direct3D
The Max version of the Cg plug-in requires that you use the Direct3D driver for Max. (If you're using Maya you can skip this step) To use the Direct3D driver, Choose "Preferences" from the Customize menu. Then click on the "Viewports" tab. At the bottom of the window is a text box that displays your currently installed driver. If it says "Direct3D" then you should be fine. If it says something else, then you need to switch to Direct3D

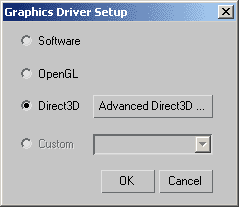
Click on the "Choose Driver" button and then choose Direct3D in the new window that pops up.

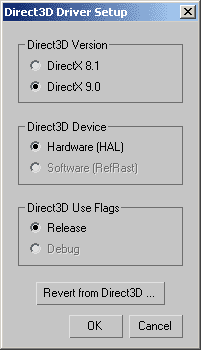
Now click on the "Advanced Direct3D" button and be sure that you're using DirectX 9.

Max should now be configured correcly.
- Create a material that uses a real-time shader
Bring up the Material Editor. Notice that there is a roll-out at the bottom called "Viewport Manager." Choose "Cg" from the drop-down menu.

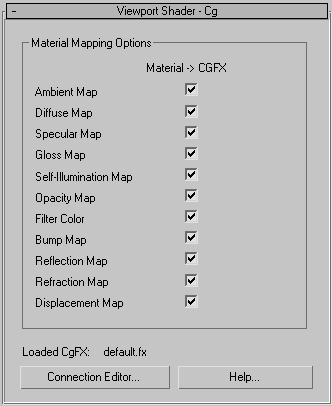
Now this material is using Cg for its viewport manager and is able to render Cg shaders in the viewport. You have a new roll-out that looks like this:

I don't use the Material Mapping Options much so you can just ignore those for now. You can read more about them in the documentation that comes with the plug-in. What we're intereseted in is the "Connection Editor" button. Click that to bring up the Connection Editor window.

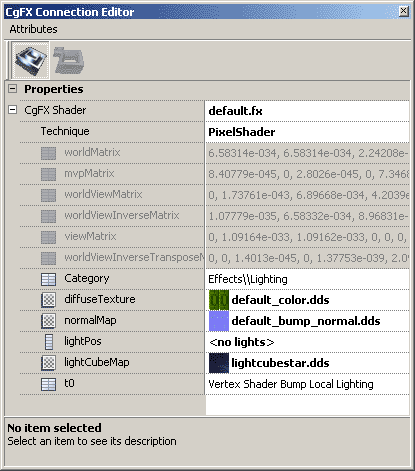
This window is similar to Max's Material Editor window in that it allows you to choose a shader and tweak that shader's settings.
- Load the normal map shader and select your normal map
If you didn't do it already, you can download my normal map shader here:
simple_normal_map_shader.fx
Now you can load this shader to use in the Max viewport. A shader is a program (a simple text document) with code that describes how the lighting calculations should be done for the material. The shader that I put together uses a normal map for per-pixel lighting. Click on the slot that says "default.fx" Two buttons appear to the right of the slot. Click on "File" button to choose the shader you want to use. Browse to the spot where you saved my shader, select it, and click "Open." Now your material is set up to use the normal mapping shader. All you need to do is load your normal map and apply it to your model. Unfortunatly, Nvidia's Cg plug-in only supports textures that are in DDS format. Take a minute to open your normal map in Photoshop and save it as a DDS file using Nvidia's DDS Photoshop plug-in.
Find the slot labeled "normalMap." It's currently filled with "default_bump_normal.dds." (If you apply the Max material to your model now, you'll see the default normal map.) Click the normalMap slot and click on the File button to browse to where you saved your normal map. Select it and hit the Open button. The shader is now using the normal map you created. If you'd like, you can also use a diffuse color map by repeting the process for the "colorTexture" slot.
- Apply the Normal Map shader to your model
If you haven't already, load your model into Max. Add an omni light source and switch to a perspective window. Now select your model. Hit the small "Assign Material to Selection" icon on the Material Editor. If all went well, you should now be looking at your model, lit per-pixel with your normal map.
So there you have it. A step-by-step tutorial on how to create and use normal maps. If you've had any problems following along with these steps or you've run into some technical issues, email me and I'll see if I can help you. Also, if you learned something from all of this, I'd love to hear from you just so I know that I've made a good use of my time putting it all together.
Now that you have the Cg Plug-in installed, take some time to load up some of the other shaders (.fx files) that came with the plug-in. You can find them here: C:\Program Files\3ds max Cg Plugin\media\CgFX. I was pretty amazed at the effects that are possible to use - right in the Max viewport! And that's just the beginning. The best part about Cg and this plug-in is that once you learn a little bit of coding, you can write your own shaders do make your surfaces look exactly the way you want them to.
Page 7 of the tutorial is a collection of Tips and Tricks you can use to create better normal maps. There are some details I've left out along the way that will help you get better results. I've included those details on page 7.
Back Next
Page 1: Introduction
Page 2: Enter the Normal Map
Page 3: What You'll Need
Page 4: Using Normal Maps for Bump Maps
Page 5: Normal Maps for High Poly Detail
Page 6: Applying Normal Maps to Your Model
Page 7: Additional Tips and Tricks
Page 8: Links to Additional Information